Timeless Templates!

Many people have asked me where they can find the template for the mini magazine holder from my previous post.  I am so flattered and encouraged by all your kind comments!  Thank you! Maybe I should revive this little blog of mine 😉

I found the template for you!  Papertrey Ink is still selling this template.  It is called “Filed with Flair” and is still available on their website. I also updated the links in the previous posts.

Hope you enjoy! Please send me a link if you do make something with it. I would love to see what you guys make!

Papertrey April Blog Hop!

bloghoplogo

Welcome Papertrey Blog Hoppers!

This month’s challenge was to create something using one of Lauren Meader‘s “My Timeless Templates“.  I made 2 things using the “Filed with Flair” template.  This template is like a magazine holder but for cards!

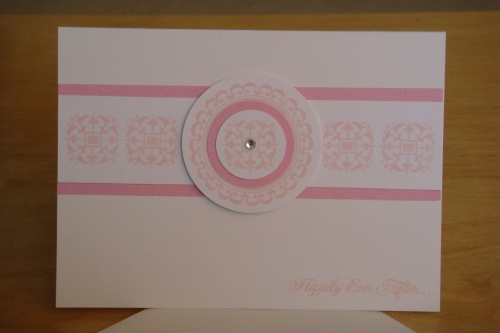
First up was a gift for my friend Maggie for her birthday:

dsc09583_crop

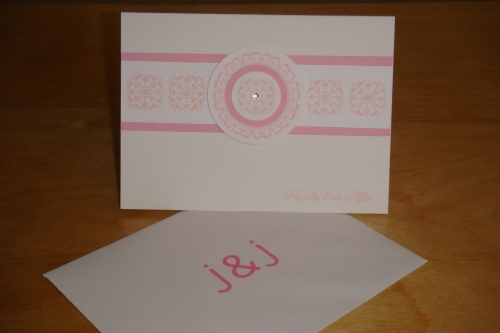
Lauren always encourages us to pretty up all sides of our project so I added a back panel to the project so that Maggie could choose which side to display.  I personalized it with her name:

dsc09585_crop

Inside I put a set of precut cards with some stamped embellishments so that she could make her own cards or leave them blank as she chooses.  I also made a set of dividers to separate each type of card with their embellishments.  Here’s a view of one of the sides with one of my favorite quotes from the “Out on a Limb Sentiments” set:

dsc09586_crop

Instead of using the leaves from “Out on a Limb”, I used an image from “Simply Stationary” to match the rest of the images.

Here is the gift all tied up with chocolate ribbon ready to go to their new owner!

dsc09599_crop

Next up is a card holder I made for my mom for mother’s day:

dsc09627_crop1

Inside I made a set of simple cards using precut blank cards so she could have cards on-hand to send as needed.  I used various stamp sets from PTI to add the card categories onto the tabs of the dividers.  I also prettied up the back panel so she could choose which way to display it:

dsc09628_crop

And the set all tied up with gorgeous PTI ribbon:

dsc09630_crop

Lauren’s templates are so easy to work with and make gift-giving so much fun!  Here are some tips I’ve come up with in using the templates:

1. My low-quality printer won’t take the high-quality PTI cardstock because it is too luxuriously thick.  So I print the template onto a thinner cardstock, cut them out, adhering the copyright and template info onto each piece of the template for reference.  Then I store them together in their own file envelope.  When it comes time to make a project, I pull out the template pieces and trace them lightly with a pencil onto the beautiful PTI cardstock and cut them out.  If there are traces of pencil marks left, I can just erase them.  I find that this actually takes me less time than printing the template out each time I want to use it!

2. Stamp and adhere the panel pieces BEFORE you assemble the final product.  This way is much easier to line up the panels and smooth them into place.

Hope these tips help!  Now go get yourself some of Lauren’s amazing “My Timeless Templates“!

Thanks for visiting!

~craftyliu~

Supplies: (All Papertrey Ink unless indicated)

Maggie’s gift:
Stamps: Fresh Alphabet, Out on a Limb Revised, Out on a Limb Sentiments, Simply Stationary, Totally Tabs (Stampin’ Up)
Ink: Aqua Mist, Dark Chocolate, Ocean Tides
Cardstock: Aqua Mist, Ocean Tides, Stamper’s Select White
Ribbon: Brown Satin (Offray)
Template: Filed with Flair (My Timeless Template)
Tools: Round Tab Punch (Stampin’ Up)

Mom’s gift:
Stamps: Bitty Baby Blessings, Borders and Corners Monogram Edition, Floral Frenzy, Simply Stationary, Wedding Day
Ink: Aqua Mist, Dark Chocolate, Ocean Tides, Spring Moss
Cardstock: Aqua Mist, Ocean Tides, Vintage Cream
Ribbon: Aqua Mist Grosgrain
Template: Filed with Flair (My Timeless Template)
Tools: Round Tab Punch (Stampin’ Up)

From the Desk of…

Have you discovered Papertrey Ink yet?  If you haven’t, hop on over there to check out the stampin’ beauties!  They are a clear stamp design company that also has a color coordination system called “Perfect Match”.  So far they have “Perfect Match” in about 21 colors that include ink, cardstock, patterned papers, ribbons and buttons.  Their stamp designs are so fresh and their designers are even fresher!  I discovered them a little more than a year ago and have been building up my little PTI collection ever since.

They release new stamp sets and colors every 15th of the month and have a countdown with sneakie peeks and projects leading up to release day.  They even have a “Come Grow with Us” program where if you buy 12 stamp sets within a year’s span of time, counting between February 15 and the following February 14th, you will receive a free Anniversary stamp set that can only be earned and not bought.  Every year, the anniversary set is different.  This year I earned the Anniversary set and I am still waiting in anticipation for it to arrive on my doorstep =)

One of newest things this year released by PTI are “My Timeless Templates” by Lauren Meader.  It is a collection of printable templates that are simple, fast and ingenius!  They are also very affordable at $5 each.  I love all things stationary so I purchased the “Desktop Organizer” template.  After seeing Nichole Heady‘s example in the countdown, I HAD to CASE it for myself.  So please forgive me for the direct CASE as I was just easing back into crafting at the time…

Here’s is the front view:

dsc09155_crop

This is the view from the side:

dsc09158_crop1

It holds 4 1/4″ x 5 1/2″ personalized notecards with envelopes.  I didn’t end up making a full set of the notecards to fill the holder because I wasn’t sure how much I would use the notecards…I may stamp regular paper weight stationary instead to fill this organizer.

Please come back on April 25th for the Papertrey Ink blog hop!  Have I got some pretty things to show you!!

~craftyliu~

Supplies:

Stamps: Polka Dot Basics, Fresh Alphabet, Simple Alphabet, Simply Stationary
Ink: Ripe Avocado, Vintage Cream
Cardstock: Kraft, Ripe Avocado, Vintage Cream
Template: Desktop Organizer (My Timeless Template)
(All Papertrey Ink)

I’m back, y’all!

After some months off, I’m back!  Back to crafting and back to blogging!  So sorry to have been MIA for awhile…would you believe it was partly due to morning all-day sickness and an adversity to the smell of ink and paper??  Oh my word, I deserve to have all my ink and paper taken away!  (Ok, I take it back, PLEASE DON’T take away my loves!)

I’ve updated the banner and the side bar a little so you can check out some new links.

On a sad note, unfortunately I will not be continuing as a Stampin’ Up demonstrator at this moment in time…but I will be back!  =)  Thank you to the ladies that have placed orders with me and I KNOW you will be enjoying your purchases!

Here is a simple card I made with the new Fifth Avenue Floral stamp set from Stampin’ Up to thank the ladies for their orders:

5th Avenue Floral Thank You

If you are interested in what my new banner picture is all about…check back soon and I will show you!

~craftyliu~

Supplies:

Stamps: Fifth Avenue Floral, Enjoy Every Moment
Ink: Baja Breeze, Kiwi Kiss, Chocolate Chip
(All Stampin’ Up)

World Card Making Day with Mom

This past Saturday was world card-making day and I spend the day with my mommy making cards. It was my mom’s first time making hand-stamped cards. She was the designer and stamper and I was the cardstock cutter and ink/stamp preparer and cleaner =P She did a really good job with the designs and I learned many new tricks and color combos from her! Here are some of the cards she made.

This card uses the Eastern Blooms branch stamp and a non-SU sentiment. The colors are apricot appeal and riding hood red. I love this color combo! I never thought to use these 2 colors together before.

This card also uses the Eastern Blooms set and a non-SU sentiment. It follows a design that I’ve CASED from somewhere online. The colors are tangerine tango and chocolate chip. Lesson learned from this design is that the sentiment doesn’t always have to be below the image, it also looks good above the image!

This card is the simplest card my mom made but also my favorite. It uses one of the trio flowers and the large flower from the Eastern blooms set. The colors are regal rose and chocolate chip. Some of the background flowers have a stamped off look because my mom stamped the flower once and then a second time without reinking. The large flower is stamped on whisper white and cut out. It is only adhered in the center and the petals are curled up a little for dimension. I love how the flowers in the background go up one side of the card like they are bubbles floating up. This is definitely one design to CASE for the future!

This last card uses the Upsy Daisy stamp set. Unfortunately again, the sentiment is non-SU but I love that script! The colors are not quite navy, baja breeze and chocolate chip. That chocolate chip is such a staple! This card is so simple but the Upsy Daisy stamp makes it so elegant! My mom also stamped all the envelopes to coordinate with the card.

What a fun day! Hope you are able to spend a day making cards sometime soon!

~craftyliu~

Alzheimer’s Heart to Heart Card

My friend’s father has been battling early onset Alzheimer’s and I am always encouraged and spurred on by her strength in supporting her family through it. I know that this kind of strength and peace can only come from a deep and intimate relationship with a sovereign and compassionate God. I have been wanting to make her a card to let her know I think about and pray for her family and was spurred on by Carolyn King’s Alzheimer’s Heart to Heart Blog Candy in honor of World Alzheimer’s Day (9/21) and the memory of her grandmother who also had Alzheimer’s.

I used Kristina Werner’s Color Inspiration #13 (KWCI#13) for the colors. I just LOVE all those colors together! I also used PaperTrey Ink’s “Flower Frenzy” and “Out on a Limb Sentiments” sets. I thought the sentiment was very appropriate: “To the world you may be just one person, but to one person you may be the world – Josephine Billings”.

I hope she may be encouraged and know that I am praying for her!

I plan to make another one to send to the staff at Artman Home, where Carolyn King’s grandmother lived the last few years of her life:

To the Staff at the Artman Home
250 N. Bethlehem Pike
Ambler, PA 19002

Do you know someone affected with Alzheimer’s or someone caring for someone with Alzheimer’s? Make a card to encourage them and let them know you are thinking of them today! If you don’t know anyone, you can also make a card and send it to the above address to encourage the staff there.

~crafyliu~

Recipe:

Stamps: Floral Frenzy (Papertrey Ink), Out on a Limb Sentiments (Papertrey Ink)
Ink: River Rock, Regal Rose, Purely Pomegranate, Wild Wasabi
Cardstock: River Rock, Whisper White
(All Stampin’ Up unless indicated)

Happy Birthday Niki!

My friend, Niki’s Birthday was last week and I found a beautiful journal with a giraffe print cover and pink lined pages for her. It was perfect because she loves giraffes and her favorite color is pink! The journal is really nice and even has perforated pages (I LOVE perforated pages!). I thought the front cover was too plain so I personalized the front cover with her name and a cute giraffe from the “Wild about You” set. I used Regal Rose ink and cardstock to match the pink on the inside:

I made some tabs for dividers and ran it through my Xyron. The tag says: “Make your own dividers! Just peel, fold and stick!”  I didn’t take a picture of the back but I adhered a stamped “Priceless” tag from the “Priceless” set over the barcode on the back =)

Here is the inside of the journal. I stamped randomly throughout the journal with different stamps and regal rose ink for “surprises” as she uses it:

Isn’t the inside of the journal so pretty? I kinda wish I bought one for myself too! =P I also made a matching card using regal rose. The background paper is stamped using PaperTrey Ink’s “Guidelines” set. Inside the card I made a gift card for Stampin’ Up stuff and used the slit punch to hold it:

I tried to make the gift card the size of a regular gift card but the slit punch was not able to reach in far enough to hold it in. (Next time I will make an insert or smaller frame inside to hold the gift card.) But I just made the gift card longer instead to fit the dimensions! Who says all gift cards have to be the same size??? =P Anyhow, this gave me some extra space on the left to stamp something! Even though I put the gift card inside the card, I was still able to write a note underneath…pretty neat!

Here’s a closeup of the card front:

I am pretty proud of this set and hope Niki liked it too! It’s always fun crafting for someone you love!

~craftyliu~

Recipe:

Stamps: Priceless, Frames with a Flourish, One of a Kind, Office Accoutrement, Totally Tabs, Wild about You, Guidelines (PaperTrey Ink), Out on a Limb Sentiments (PaperTrey Ink), Trajan Monogram Edition (PaperTrey Ink), Borders and Corners Monogram Edition (PaperTrey Ink)
Ink: Regal Rose, Pink Pirouette
Cardstock: Regal Rose, Whisper White
Accessories: Boho Blossoms Punch, Key Tag Punch, Ticket Corner Punch, Tag Punch, Small Tag Punch, Slit Punch, Corner Rounder (Fiskars), Bling (Lisa Bearnson), Xyron Machine

I gave out my 1st catalog!

Today I gave out my 1st catalog to a friend…it was so exciting to share something I love with a good friend! I printed out my info label using the Pacific Point In Color and stuck it on the back. It feels really good to have my name on the catalog…I’m so proud! I’ve seen other ideas floating out there about wishlists for the catalog, so I decided to make up a wish bookmark using the “One of a Kind” stamp set and various punches.

To make the tag longer for the sentiment, I cut cardstock the same width as the tag but threaded the end through the back of the punch so that the punch only punched out the tag corner end. This allows you to make your tag any length you want! Then I stamped the boho flowers with Pacific Point ink on Whisper White and punched them out with the boho blossoms punch. At first I used an eyelet on the tag and was going to leave it as a tag. But then I got the idea to make it into a moving bookmark so I cut cardstock the same width as the tag but longer and attached the tag with a brad. The eyelet actually helps the tag swing more freely.

I don’t have the “wishlist” stamp so I used “wish big” from “Short and Sweet”. I love that cute little set! The brad is from Making Memories but it matches pretty good to Pacific Point! I also added my name label to the back of the bookmark. I didn’t think to use the label to cover up the prongs of the brad but will do that next time. I would probably also punch the top of the bookmark part with the tag punch also when I make it again so that the two layers match. I plan to try this with other In Colors, matching the bookmark to the label color =)

The catalog’s so good, even the baby wanted to touch it!

Are YOU enjoying the new catty??

~craftyliu~

Recipe:

Stamps: One of a Kind
Ink: Pacific Point
Cardstock: Whisper White, Pacific Point
Accessories: Tag Punch, Small Tag Punch, Boho Blossoms Punch, Crop-a-dile, Brad (Making Memories), Eyelet (K & Company)

I’m a Stampin’ Up Independent Demonstrator!

I have always loved Stampin’ Up. Many years ago, I saw a demonstrator at a craft show demonstrating a versamark resist brayering technique on glossy paper. I was instantly mesmerized. Fast forward to today, I finally took the plunge! I took advantage of the current $99 starter kit promotion (Hurry and join too! It is so easy! This promotion ends October 11th! Ask me how to join!). The starter kit is normally $199 though it comes with more products than the $99 kit. I am so proud to be part of the Stampin’ Up family. I joined a really nice group of stampers…”The Heartfelt Stampers”…and they are all very welcoming and supportive of this new rookie =) I joined at such an awesome time too…with the new In-Colors, die-cut stamps, 2-step stamping, new punches (I love punches with coordinating stamps!) and the most GORGEOUS papers ever! I seriously flip through the catalog at least once a day! (Let me know if you want to get a catalog in your hot little hands too!)

My first order of Stampin’ Up goodies came today and I was super excited to rip open the box and play! I had about half of the stamp sets I got mounted and couldn’t wait any longer to start inking. I CASE’d (Copy and Share Everything) this card using the Eastern Blooms stamp set. I don’t have the 5-petal flower punch yet (next on my list!) so I did not include that from the original. I didn’t do the rock-and-roll technique with the central flower because I didn’t want to contaminate my new ink pads. Also, I left out one of the tangerine tango layers because I didn’t want to use up too much of my new cardstock =) I am way protective over my precious Stampin’ Up stuff =P

What do you think? You like?

I mistakenly used Tangerine Tango at first to ink the “kindness” sentiment from “Heard from the Heart”. The Hubs said it was too hard to read. I remembered that I had ordered a “Stamp-a-ma-jig” so I used it to stamp over the Tangerine Tango with Riding Hood Red to make the sentiment stand out more. Hubs says it looks much better! You can’t even tell the Tangerine Tango was there 1st. That “Stamp-a-ma-jig” is ingenius!

Check out the catalog above and to the right —> to order yourself some gorgeous Stampin’ Up stuff! For a limited time, I am offering free shipping with any order over $50! Order today!

~craftyliu~

Recipe:

Stamps: Eastern Blooms, Heard from the Heart
Inks: Tangerine Tango, Riding Hood Red, Apricot Appeal
Cardstock: Tangerine Tango, Riding Hood Red, Whisper White
Accessories: Ticket Corner Punch, Stamp-a-ma-jig, mini pop dots (All Night Media)
(All Stampin’ Up unless indicated)

j + j

As we’re waiting for the results of the contest to come in, let’s take a look at a card I made for a friend’s wedding last month:

I used the stamp set, “Wedding Day” from Papertrey Ink and the ink color, Sweet Blush also from PTI. The design was inspired by Nicole Heady at PTI – http://nicholeheady.typepad.com/capture_the_moment/2008/03/4.html – but I changed it quite a bit to suit my card since my card shape and size was different. The “j & j” are rub-ons by ScrapWorks. The rhinestone is from a Bling-It-On kit by Lisa Bearnson. Here’s a close-up of the card:

Congratulations J + J!

~craftyliu~